OSP10 with Contrail Juniper SDN
Please start by reading the official Juniper documentation. It’s far from being perfect but it’s a good starting point to understand how the integration has been done.
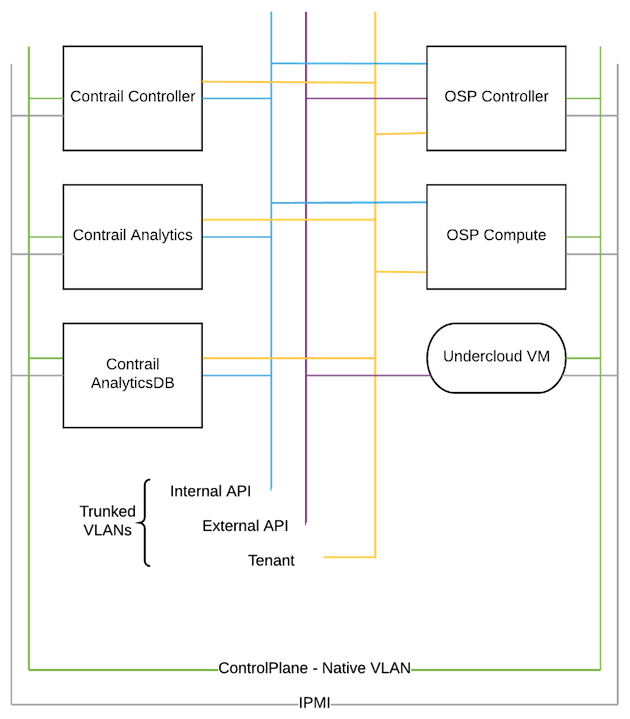
Logical architecture
Install Juniper’s package
The integration of Contrail to the TripleO heat templates is somehow quite limited. Basically Juniper’s leverage the templates to deploy basic RHEL7 nodes, and uses a long shell script (~450 lines) to actually do the work on a pre deployment hook.
The first thing to do on the undercloud, is then to install the Contrail RPM:
yum localinstall contrail-install-packages-4.1.1.0-12_newton.el7.noarch.rpm
This will install only 3 files:
rpm -ql contrail-install-packages-4.1.1.0-12~newton.el7.noarch
/opt/contrail/contrail_packages/contrail_rpms.tgz
/opt/contrail/contrail_packages/setup.sh.new
/opt/contrail/puppet/contrail-puppet-manifest.tgz
During the pre deployment hook, the script will install a bunch of various packages, that has to come from a repository. The easiest way is to set it up on the undercloud host. Please note that Red Hat repository has to be set up on the overcloud nodes too. Make sure to configure those repositories as Contrail’s packages require them for dependencies. Also at least for Contrail 4.1, due to an issue with Java and Cassandra 3.0, you need to have on your Red Hat repository this specific version of Java “1.8.0.151-5.b12.el7_4”. All the other packages as set to “latest”:
- rhel-7-server-rpms
- rhel-7-server-extras-rpms
- rhel-7-server-rh-common-rpms
- rhel-ha-for-rhel-7-server-rpms
- rhel-7-server-openstack-10-rpms
- rhel-7-server-openstack-10-devtools-rpms
Create and extract Contrail’s packages:
sudo mkdir /var/www/html/contrail
sudo tar zxvf /opt/contrail/contrail_packages/contrail_rpms.tgz-C /var/www/html/contrail/
You will then need to install on the undercloud the puppet manifest and modules, and heat templates from Juniper:
cd /var/www/html/contrail
yum localinstall contrail-tripleo-puppet-4.1.1.0-12.el7.noarch.rpm puppet-contrail-4.1.1.0-12.el7.noarch.rpm contrail-tripleo-heat-templates-4.1.1.0-12.el7.noarch.rpm
The last part is to merge Red Hat and Juniper’s heat contrail and to create the tarball than will be uploaded to Swift as TripleO artifacts. As the puppet code fro Juniper isn’t present the the overcloud image Red Hat is shipping, we need TripleO to copy the puppet code before running the deployment shell script.
mkdir -p ~/usr/share/openstack-puppet/modules/contrail
cp -R /usr/share/openstack-puppet/modules/contrail/* ~/usr/share/openstack-puppet/modules/contrail/
mkdir -p ~/usr/share/openstack-puppet/modules/tripleo
cp -R /usr/share/contrail-tripleo-puppet/* ~/usr/share/openstack-puppet/modules/tripleo
cd ~
tar czvf puppet-modules.tgz ~/usr/
upload-swift-artifacts -f puppet-modules.tgz
Then create the TripleO heat templates directory that you will use as reference for your deployment, and add the contrail code to it:
cp -r /usr/share/openstack-tripleo-heat-templates/ ~/my_contrail_templates
cp -r /usr/share/contrail-tripleo-heat-templates/environments/contrail ~/my_contrail_templates/environments
cp -r /usr/share/contrail-tripleo-heat-templates/puppet/services/network/* ~/my_contrail_templates/puppet/services/network
TripleO heat templates
My deployment command will look like that:
source ~/stackrc
templates="/home/stack/my_contrail_templates"
openstack overcloud deploy --templates $templates \
  -r $templates/environments/contrail/roles_data.yaml \
  -e $templates/environments/contrail/contrail-services.yaml \
  -e $(pwd)/network-isolation.yaml \
  -e $templates/environments/contrail/contrail-net.yaml \
  -e $(pwd)/custom.yaml \
  --timeout 180
So basically you need to use Contrail’s roles_data.yaml which is describing the new roles (ContrailController, ContrailAnalytics and ContrailAnalyticsDatabase), contrail-services.yaml and contrail-net.yaml which are describing the Contrail setup. I won’t describe them are they are quite self explanatory. Same for the network-isolation.yaml which is quite simple and just describing the logical network architecture in the diagram above.
The content of the custom.yaml is:
[stack@undercloud deployment]$ cat custom.yaml
resource_registry:
  OS::TripleO::Controller::Net::SoftwareConfig: ./osp-controller-nic-config.yaml
  OS::TripleO::ContrailController::Net::SoftwareConfig: ./contrail-nic-config.yaml
  OS::TripleO::ContrailAnalytics::Net::SoftwareConfig: ./contrail-nic-config.yaml
  OS::TripleO::ContrailAnalyticsDatabase::Net::SoftwareConfig: ./contrail-nic-config.yaml
  OS::TripleO::Compute::Net::SoftwareConfig: ./contrail-nic-config-compute.yaml
  OS::TripleO::NodeUserData: ./install_vrouter_kmod.yaml

parameter_defaults:
  ServiceNetMap:
    ContrailControlNetwork: tenant
    ContrailVrouterNetwork: tenant

  VrouterPhysicalInterface: vlan50
  VrouterGateway: 172.17.0.254
  VrouterNetmask: 255.255.255.0
  ControlVirtualInterface: vlan20
  PublicVirtualInterface: vlan10
  VlanParentInterface: eth1

  # This section is where deployment-specific configuration is done
  # CIDR subnet mask length for provisioning network
  ControlPlaneSubnetCidr: '24'
  # Gateway router for the provisioning network (or Undercloud IP)
  ControlPlaneDefaultRoute: 192.168.24.254
  EC2MetadataIp: 192.168.24.1  # Generally the IP of the Undercloud

  # Customize the IP subnets to match the local environment
  InternalApiNetCidr: 172.17.0.0/24
  TenantNetCidr: 172.16.0.0/24
  ExternalNetCidr: 10.0.0.0/24
  # Customize the VLAN IDs to match the local environment
  InternalApiNetworkVlanID: 20
  TenantNetworkVlanID: 50
  ExternalNetworkVlanID: 10
  # Customize the IP ranges on each network to use for static IPs and VIPs
  InternalApiAllocationPools: [{'start': '172.17.0.10', 'end': '172.17.0.50'}]
  TenantAllocationPools: [{'start': '172.16.0.10', 'end': '172.16.0.50'}]
  # Leave room if the external network is also used for floating IPs
  ExternalAllocationPools: [{'start': '10.0.0.10', 'end': '10.0.0.50'}]

  ControllerSchedulerHints:
    'capabilities:node': 'overcloud-controller-%index%'
  ComputeSchedulerHints:
    'capabilities:node': 'overcloud-novacompute-%index%'
  ContrailControllerSchedulerHints:
    'capabilities:node': 'overcloud-contrailcontroller-%index%'
  ContrailAnalyticsSchedulerHints:
    'capabilities:node': 'overcloud-contrailanalytics-%index%'
  ContrailAnalyticsDatabaseSchedulerHints:
    'capabilities:node': 'overcloud-contrailanalyticsdatabase-%index%'

  ControllerHostnameFormat: 'overcloud-controller-%index%'
  ComputeHostnameFormat: 'overcloud-novacompute-%index%'
  ContrailControllerHostnameFormat: 'overcloud-contrailcontroller-%index%'
  ContrailAnalyticsHostnameFormat: 'overcloud-contrailanalytics-%index%'
  ContrailAnalyticsDatabaseHostnameFormat: 'overcloud-contrailanalyticsdatabase-%index%'

  ControllerCount: 1
  ComputeCount: 2
  ContrailControllerCount: 1
  ContrailAnalyticsCount: 1
  ContrailAnalyticsDatabaseCount: 1

  OvercloudControlFlavor: baremetal
  OvercloudContrailControllerFlavor: baremetal
  OvercloudContrailAnalyticsFlavor: baremetal
  OvercloudContrailAnalyticsDatabaseFlavor: baremetal
  OvercloudContrailTsnFlavor: baremetal
  OvercloudComputeFlavor: baremetal
  OvercloudContrailDpdkFlavor: baremetal

  TimeZone: 'Asia/Singapore'
  NtpServer: ["time.google.com"]
  DnsServers: ["192.168.24.254"]
I’ve copied the install_vrouter_kmod.yaml in my deployment directory as I modified it a little bit to configure my local Red Hat repository. Then I also changed the ServiceNetMap since by default the templates are using the internal API even for the workload traffic. I have used node placement and custom hostname for convenience but also because the pre deployment script is MATCHING THE HOSTNAME to perform its task! The Contrail Controller for example will only be deployed if the hostname is matching “%something%contrailcontroller-%index%”. Please be very careful of this or modify the script if needed. By default the Juniper’s templates expect some flavors but since I’m deploying with node placement I overwrite them to use the baremetal flavor.
To perform the node placement part, I’ve ran theses commands to update ironic properties:
ironic node-update ctrl-0 replace properties/capabilities='node:overcloud-controller-0,boot_option:local'
ironic node-update cmpt-0 replace properties/capabilities='node:overcloud-novacompute-0,boot_option:local'
ironic node-update cmpt-1 replace properties/capabilities='node:overcloud-novacompute-1,boot_option:local'
ironic node-update contrail-ctrl-0 replace properties/capabilities='node:overcloud-contrailcontroller-0,boot_option:local'
ironic node-update contrail-anal-0 replace properties/capabilities='node:overcloud-contrailanalytics-0,boot_option:local'
ironic node-update contrail-analdb-0 replace properties/capabilities='node:overcloud-contrailanalyticsdatabase-0,boot_option:local'
Conclusion
Following those steps will lead you to a very basic deployment and not suitable for production, but that will allow you to deploy in a fully automated way a working OSP 10 with Contrail. For a production deployment I will recommend you to read contrail-services.yaml and contrail-net.yaml and overwrite the values where it makes sense (like the default password for example). The default values of Contrail are also very generic and tailored to a CI deployment. Even for an actual customer lab deployment I ended up overwriting both files values to a point where I don’t even use them anymore and I’ve copied over the “OS::TripleO::Services” in my yaml instead as it was the only remaing useful part of them.
Download my templates
As always you can download the templates of my example here.